


To find a roof leak, start in the attic with a flashlight before you go anywhere near the roof. Look for water stains, dark streaks, or daylight through the boards. The drip you see on the ceiling is almost never directly below the entry point — water travels along the deck and rafters before it drips. Once you narrow down the zone, check the roof surface for damaged flashing, lifted shingles, cracked vent boots, or debris in the valleys.
With 30 years on North Shore roofs and over $50 million in settled insurance claims, JSMM Inc. knows that a methodical approach finds leaks faster than luck.
This guide walks through every step in order. Follow it once and you will understand your roof better than most homeowners ever do.
If you already know the leak exists but want to understand why it happened, our guide on the most common causes of roof leaks covers the root reasons.
Table of Contents
ToggleLeak You Can't Locate?
Contact JSMM Inc. for a free inspection. We find roof leaks other contractors miss, across Highland Park and the full North Shore.
Why Is a Roof Leak So Hard to Find?
The core reason is simple: water does not drip straight down once it gets inside the roof. It enters at one point, then travels sideways and downhill along the roof deck, rafters, or insulation before it finds somewhere to drip.
That means a stain on your ceiling in the living room could come from an entry point three to eight feet away, and often in a different direction than you expect.
This is also why ceiling water stains are a clue, not a diagnosis. They tell you water is there, not where it got in. Finding the entry is the whole job.
What You Need Before You Start
You do not need specialist equipment. Most roof leaks can be tracked down with things already in your home.
- A flashlight — the brighter the better
- A garden hose with a helper inside the attic
- Painter’s tape or chalk to mark what you find
- Non-slip shoes and gloves if you go on the roof
- Binoculars to check the roof surface from the ground first
- A notebook or phone to photograph and record locations
The one thing you should never do: go on the roof during or right after rain. A wet roof is extremely dangerous. Do this work on a calm, dry day.
Step 1: Check the Attic Before You Go Outside
This is the step most people skip. It is also the most useful.
Go into the attic on a bright sunny day or right after a rainstorm, with a flashlight. Turn the flashlight off first and look in the dark for any pinpricks of daylight coming through the boards. Even one tiny hole is a confirmed leak path.
Turn the flashlight back on and scan the underside of the roof deck. Look for these signs:
- Dark water stains on the boards or rafters (brown, black, or grey rings)
- Damp or wet wood, or insulation with dark wet patches
- White mineral deposits, which form when water dries and leaves calcium behind
- Mold or mildew, especially in corners and low points
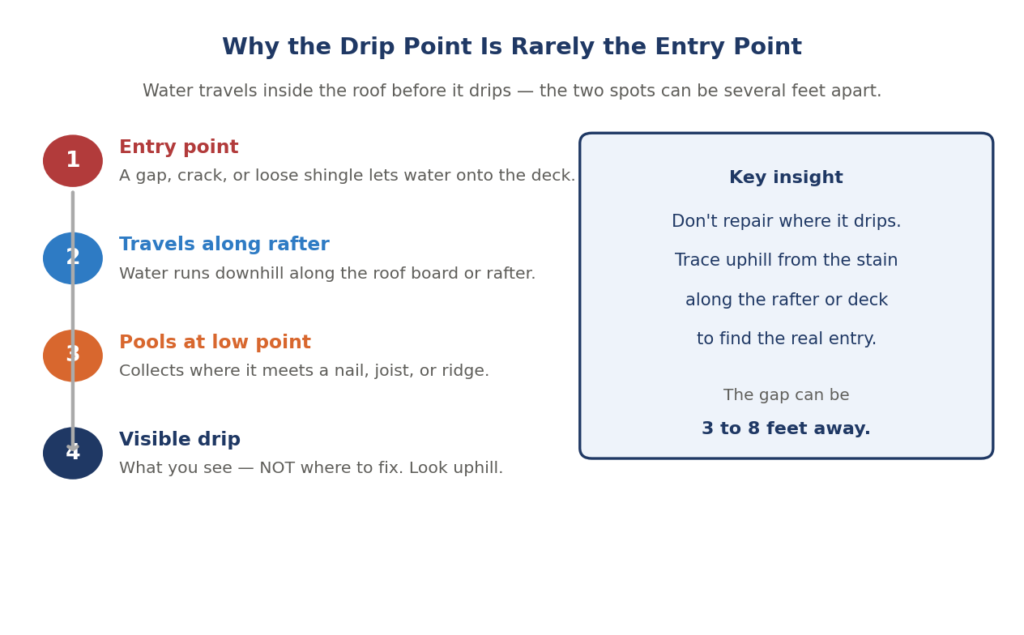
When you find a stain, trace it uphill. Water runs toward the peak, so the entry point is uphill from the drip. Follow the stain trail toward the ridge until you see where it starts.
Mark the spot with tape. Then measure the distance from the peak and from the nearest gable wall. You will use those measurements to find the matching spot on the roof surface.
Wet decking in the attic means the water has been there long enough to soak in. Our guide on when roof decking needs replacing helps you judge how much damage has been done.
Step 2: Scan the Roof Surface from the Ground First
Before you step on the roof, do a full visual check from the ground. Use binoculars if you have them.
Walk around the house slowly and look at the roof above the area where the stain is. You are looking for anything that breaks the smooth, even surface of the roof.
The most important spots to look at are: flashing around the chimney, around skylights, and along any wall that meets the roof. Lifted, bent, or missing flashing is the single most common cause of roof leaks.
Also look for missing shingles, shingles that are lifted at the edges, dark stains on the surface, and debris collecting in the valleys between two roof slopes.
Storm damage from wind or hail also causes leaks. If you had a recent storm, our hail damage guide helps you spot impact marks from the ground.
Found Something Suspicious but Not Sure It's the Source?
Call JSMM Inc. at (847) 410-7060. We confirm the source and give you a clear repair plan before you spend a dollar.
Step 3: Use the Hose Test to Isolate the Zone
If the attic and ground checks do not give you a clear answer, the hose test does. This is how professional roofers track down stubborn leaks.
You need a helper. One person stays in the attic with a flashlight. The other takes a garden hose onto the roof. Here is the method:
- Start at the lowest point of the suspected area — soak that section for two to three minutes.
- Wait. Do not move until the person in the attic calls out or you have waited at least three minutes.
- If nothing appears, move up one section and repeat.
- Work your way up toward the peak in strips, one section at a time.
When the helper spots water, you have isolated the entry zone to the section you were soaking. That narrows the search to a small area of the roof instead of the whole surface.
Only do this on a calm, dry day. Do not attempt the hose test on a steep roof without the right footwear and safety equipment.
Step 4: Inspect the Four Most Common Entry Points
Once you know the zone, here is where to look first. These four spots account for the vast majority of roof leaks.
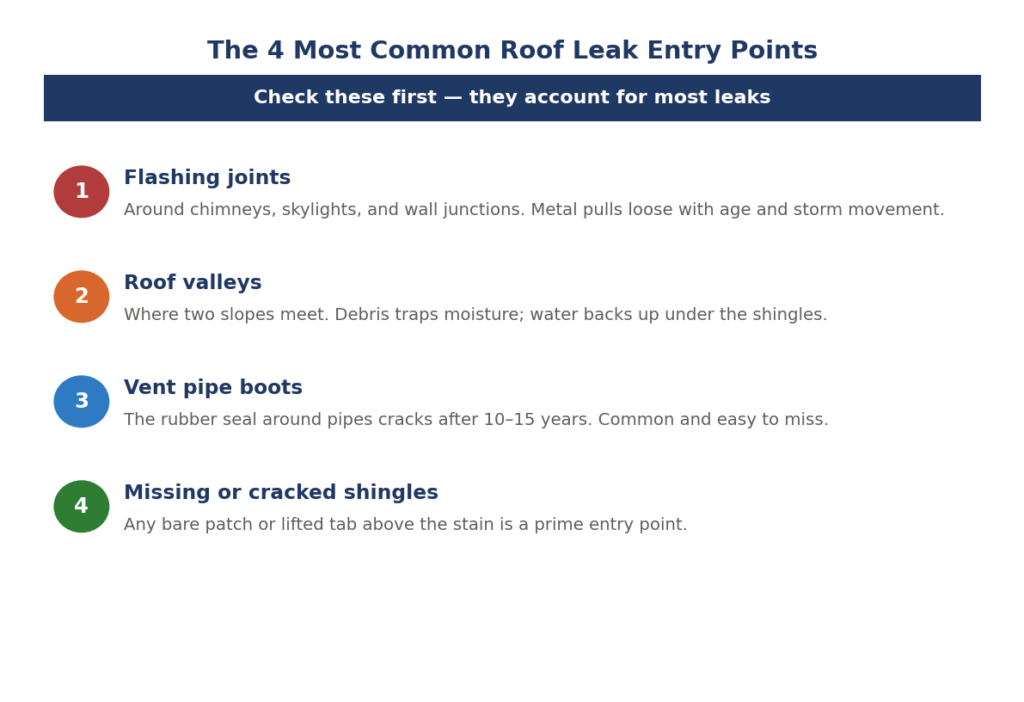
1. Flashing Around Chimneys, Skylights, and Walls
Flashing is the metal seal where the roof meets a vertical surface. It moves with temperature changes and eventually pulls loose, gaps open, and water gets in. Run your fingers along the edge. If it lifts even slightly, you have found your source.
Our guide on roof flashing and when to replace it covers what bad flashing looks like and when it needs a professional repair.
2. Roof Valleys
Valleys are where two slopes meet. Water and debris concentrate there. Leaves and grit compact and hold moisture against the shingles. Look for shingles that are worn thinner in the valley or any lifting at the edges.
3. Vent Pipe Boots
Every pipe that pokes through your roof has a rubber seal called a boot. That rubber cracks and shrinks with age, usually between 10 and 15 years. If the pipe is in the zone you identified, lift the shingle around the boot and look at the seal.
4. Damaged or Missing Shingles
Any bare patch or shingle that is cracked, lifting, or curling above the stained area is a prime candidate. Shingles that look fine from the ground can have hairline cracks that let water through.
What to Do After You Find the Leak
Mark the exact spot. From inside the attic, push a nail or a bright piece of tape through the deck so you can find it from outside. From the roof surface, circle it with chalk.
Then decide: can this be fixed now, or do you need a professional? A single loose shingle or a small gap in sealant is a quick fix. Flashing that has pulled away from a chimney, widespread shingle damage, or deck rot needs a roofer.
If water is actively coming in, act immediately. Our guide on what to do when your roof is leaking in heavy rain covers the holding measures you can take right now.
For the full repair, our roof repair service across Illinois covers storm damage, flashing, shingles, and anything else the inspection finds.
When You Cannot Find the Leak Yourself
Some leaks are genuinely hard to find without professional tools or access. If you have followed every step and still cannot locate the source, that is not failure — it is information.
Leaks that hide from homeowners are usually: under two layers of roofing material, on a complex multi-valley roof, above a finished ceiling with no attic access, or the result of wind-driven rain getting under the drip edge rather than through the shingles.
A professional roof inspection uses different vantage points and more experience than any DIY check. An inspector checks areas no one can safely access from the ground.
Frequently Asked Questions
How do you find a roof leak without going on the roof?
Start in the attic with a flashlight. Look for stains, wet wood, daylight, and mold. Trace stains uphill to find the entry zone. Good maintenance habits also catch problems before they turn into active leaks.
Can a roof leak be hard to find even for professionals?
Yes. Some leaks only appear during specific wind directions or when rain hits at a certain angle. Professional roofers use hose tests, infrared cameras, and experience to track these down when they are not obvious.
What does a roof leak look like in the attic?
Stained wood in shades of brown, black, or grey. Damp or sagging insulation. White mineral rings where water dried. Daylight visible through the boards. In active leaks, you may see water glistening or dripping from the deck.
How long does it take water to show up as a ceiling stain?
It varies. A large fast leak shows as a stain within hours. A slow seep into the insulation can take days or even weeks to appear on the finished ceiling below. This is why minor leaks can go unnoticed for a long time.
Should I fix a roof leak myself or call a roofer?
A single lifted shingle or small sealant gap can be a DIY fix. Anything involving flashing, multiple shingles, valleys, or deck damage is a job for a professional. Our guide on roof repair versus replacement helps you judge the scale of what you’ve found.
Still Can't Find the Leak?
Contact JSMM Inc. or call (847) 410-7060. We provide free, honest leak inspections across Highland Park and the North Shore, and we find what others miss.